This post may contain affiliate links. Please read our disclosure policy.
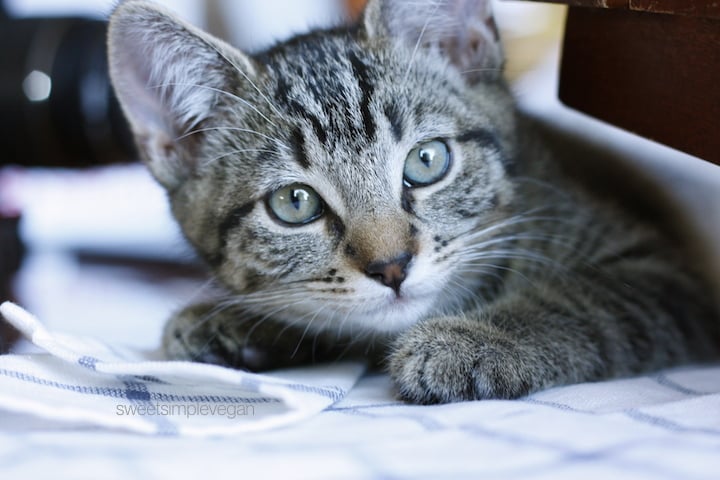 In June, I got a new kitty! Her name is Goji and she is the cutest little thing. And I am not being biased, she is adorable! When I started to look for a collar for her, I could not find one in any cute fruit/vegetable prints that I was envisioning. I sat down on my computer, searched etsy and picked a few out, but then I got to thinking: if these people could make these little collars, why can’t I? I found a few tutorials (sourced below), ordered the hardware I needed ($1.80!), got my supplies together and made a collar! This tutorial is really simple and can be done in a matter of 15 minutes.
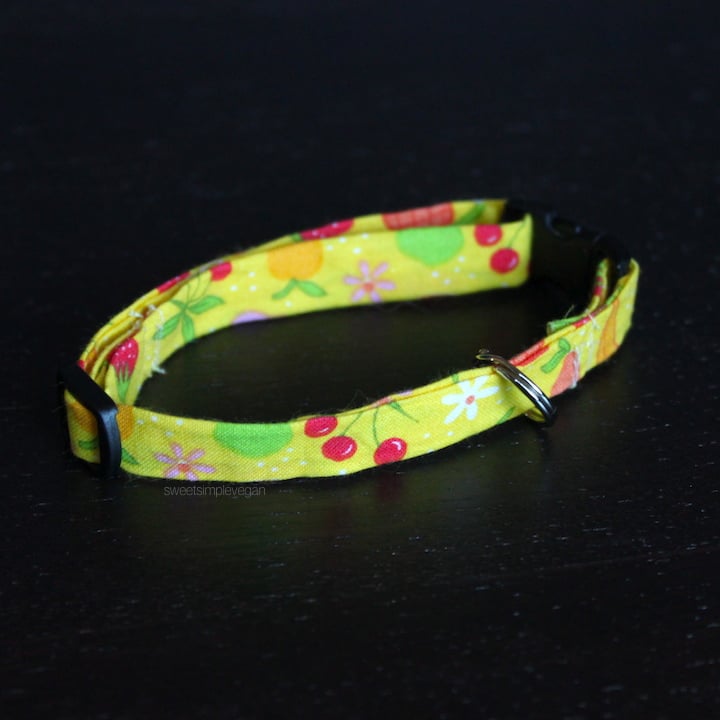
Read through the directions before you get started, so that the process will go through smoothly. You can even look at the tutorials I have sourced at the end of this post to get a better understanding from al of the different pictures you can view. Also, check out this Youtube Video by Caninedesign.us. It helped me understand which way to face the hardware before sewing to prevent mistakes.  Update: So, somehow Goji’s collar got caught on something in my closet and came off. What’s good is that I know the hardware I ordered is definitely legitimate “safety” collar hardware, but I wanted to share because of that! Also because of this, I suggest using darker material or even finding a material you feel is best for the adventures your cat will take it on. The original yellow collar (when found) was cotton and quite dirty. I did not realize how dirty it had gotten until I did not see it for a while.
AND guess what?! I am giving away a collar kit so you can use this tutorial and make one for yourself! Follow me on Instagram, and comment on the collar post as to why you want to make the collar.
Good luck and enjoy! xx
 Materials:
- Cat collar refill set (I used Creative Designworks, LLC as these are super cheap yet good quality!)
- Fabric of choice (15″ x 1 1/2″)
- Iron
- Sewing machine OR needle and thread (*Make sure the thread is a color similar to that of the fabric)
- Stitch witchery
- Damp cloth
Instructions:
- Cut your fabric into a piece that measures 15 x 1 1/2 “. Fold in half lengthwise and iron to mark the middle.
- Open the fabric up and now fold each side, lengthwise, to the middle line. Fold it in half lengthwise, and iron to keep each side down.
- Sandwich a piece of stitch witchery in between the collar, on the sides with the open ends of the inward folds. In increments along the length of the collar, you will now iron the collar closed. Place the damp cloth over the part to iron, and steam and press for 10 seconds. My iron was set on “Wool” when doing so. Please read the instructions on the stich witchery box to be sure you do this properly! Continue to do this along the length of the collar until complete.
- Allow the collar to sit for a few minutes to dry and for the stitch witchery to harden and seal the collar shut.
- Whip out your sewing machine OR needle and thread, and get the hardware ready. In order to add the hardware, I will refer you to a Youtube Video by Caninedesign.us that I used.The hardware has curves to fit the neck of your cat most comfortably, so pay attention while doing this to be sure it is done correctly. What I did was pin the pieces together first to be sure the final product was correct.
Sources I used to create this tutorial:
- Flossy Blossoms
- Night Owl Corner
- DIY Tutorial Video by Caninedesign.us


Thanks for the article Dear
It is a very helpful blog for DIY cat collars. You teach us very simple and easy ways for DIY cat collars.
I’m so glad my tutorial was helpful to you! Your collar turned out great! Shortly after I made his collar, we lost my precious Cooper to kidney disease. You sweet little kitty reminds me of my Cooper so much!
I am so sorry to hear that 🙁 Thank you so much for this!